Host Your Flask App on Amazon ECS — Part 1: CI/CD Pipeline
Navigating hosting without an in-depth knowledge about the process or prior experience is a real challenge. Especially, if you need to get your application production-ready.
I faced this challenge for quite some time until I figured it out with some much needed expertise. With this two-part blog, I am here to guide you through this maze and help you configure your flask application to get it production-ready using Amazon ECS.
This blog can be extended to an application of any tech stack.

This first part of the blog is centered around setting up a CI/CD pipeline and the second, on configuring Amazon ECS and deploying the application.
We will go through the following concepts and implementations in the first part:
- What is a CI/CD pipeline?
- What is Docker?
- Prepare the flask app for production using Waitress
- Containerize the app
- Build the pipeline
- Define variables on bitbucket
Pre-requisites
- A simple flask application running on the development server
- AWS account
- Bitbucket account
- docker installed
What is a CI/CD pipeline? Why should we use it?
It is, now, more important than ever to ship your product faster and to bring new features and versions of it to your customers. The Build-Measure-Learn loop is an integral part of building a product and I would recommend reading more about it in this article published by Microsoft, which talks about building strong customer relationships by adhering to the Build-Measure-Learn loop. Today, riding this loop is what gives you a competitive advantage in the market and how does engineering play a role in achieving this?
Enter CI/CD!
CI/CD stands for Continuous Integration and Continuous Deployment and it is a series of steps written to automate the process of releasing new versions of a software during the software development lifecycle.
CI is a process where all the developers working on an application, merge their code to a central repository, ensuring all features of the application are continuously integrated. Every merge to the central repository, triggers a sequence of the build-and-test process. The application is built with the new code changes and is tested against predefined unit and integration tests.
CD is a process where, the latest version of the software/application which is built and thoroughly tested and is now deployed to an infrastructure manually designed by an engineer.

By automating CI/CD, engineers are more focused on writing high quality code, tracking the performance of the application via logs and shipping new features of a product much faster. It reduces human error and allows easy rollback to a more stable version of the application in the event of a failure.
To understand CI/CD in greater detail, I would recommend this blog by Marko Anastasov. As the title suggests, Marko very gently introduces you to the world of CI/CD by gradually unfolding its elements and intricacies.
What is Docker? Why should we use it?
Docker is a container that has everything needed to run your application, including libraries, packages, runtime, the code base and other tools. It ensures that your code is platform and environment agnostic. The docker container can be run on any machine and we can be sure that the code will be executed successfully.
When you “containerize” your application, you’re essentially, creating an image of the latest version of your application and this image is used to spin a container that can be deployed anywhere. So in the event of a failure, it is easy to rollback to a stable image and spin a different container.

To get your hands dirty with Docker, I would recommend this tutorial by Mosh Hamedani. It is a comprehensive, concise and a no-nonsense tutorial to learn Docker.
And of course, all hail the official documentation for anything out there, right?
Prepare the flask app for production using Waitress
Let’s initialize a git repository for this flask app, create a repository on bitbucket and push the code to this central repository.
To run a flask app in production, we cannot make use of the inbuilt server, albeit lightweight, it is not suitable for production systems. We will have to use a production Web Server Gateway Interface(WSGI) server like Gunicorn, Waitress or others. We will be using Waitress here. Gunicorn is also a very popular choice.
- Install Waitress using pip.
- Import the serve method from the package
- Run the app using serve instead of app.run()
pip install waitressfrom flask import Flask
from waitress import serve
app = Flask(__name__)
@app.route("/")
def hello():
return "<h1>Waitress here!</h1>"
if __name__ == "__main__":
#app.run(host='0.0.0.0')
serve(app, host='0.0.0.0', port=5000)Now our flask app is running with a production server. We will commit and push these new changes to our remote branch on bitbucket.
In order to maintain and manage all the packages required to run this app, we will add all the packages in requirements.txt using
pip freeze > requirements.txtContainerize the app
Before we talk about writing a Dockerfile and spinning a container. Let’s talk about Amazon ECR.
What is Amazon ECR and why do we use it?
Amazon ECR stands for Elastic Container Registry and it is a registry of repositories to easily store and manage docker images. It is integrated with Amazon ECS so we just have to specify the ECR repository in our ECS service task and the task would fetch the specified image, spin a container and deploy our application.
So all our docker images are pushed to ECR and the steps to achieve this will be written in the bitbucket-pipelines.yml file. First, let’s write the Dockerfile.
Create a Dockerfile in your project directory. Note, the file has to be named as it is. This file is a simple sequence of tasks that docker needs to perform in order to build the code and include everything needed to run the code in a container, so it can be run on any machine. The docker file will look like this.
FROM python:3.8

RUN mkdir /flask-app
WORKDIR /flask-app
COPY requirements.txt /flask-app/requirements.txt
RUN python3 -m pip install -r /flask-app/requirements.txt

COPY . /flask-app
EXPOSE 5000:5000

ENV FLASK_APP=app.py
CMD ["flask", "run", "--host", "0.0.0.0"]
- First, we are telling Docker to use python 3.8
- We ask Docker to create a new directory in its environment with the same directory name as our project directory name.
- Now we ask it to enter the working directory which is the project directory.
- In the working directory, we ask it to copy the requirements.txt file from the project directory on our machine to the requirements.txt file in its environment.
- Now we ask Docker to install all the packages required to run this app from the requirements.txt file
- We ask it to copy all the files from the project directory on our machine onto the project directory in its environment and expose port 5000.
- Finally, we tell Docker that the command to run our app is flask run — host “0.0.0.0”
We have now written the steps to containerize the app. Now we run the Dockerfile and create an image to validate the steps we have written.
Note: We are not pushing the image to ECR here. We are simply validating if docker can follow through with the steps and create a docker image.
We give the docker image an alias — flask-app. To run the Dockerfile, we use
docker build -t flask-app .This command builds the image from the Dockerfile in the current working directory. On running this command, docker will install all the packages and run the flask server successfully.
Build the pipeline
The pipeline is a YAML file defined to initiate execution of the CI/CD process. This file helps us configure the deployment approach for each environment(development, staging, production) and it includes steps that need to be processed by the version control system like bitbucket.
Create a bitbucket-pipelines.yml file in the project directory and write the following steps in this file. Note, the file has to be named as it is.
image: python:3.9.5

pipelines:
  branches:
    "master":
      - step:
          name: Publish docker image to ECR and deploy ECS
          deployment: Production
          services:
            - docker # Enable Docker for your repository
          script:
            - export EXECUTE_DEPLOYMENT_FILE_COMMAND=./.bitbucket/workflows/prod/deploy/master.sh
            - chmod +x $EXECUTE_DEPLOYMENT_FILE_COMMAND
            - $EXECUTE_DEPLOYMENT_FILE_COMMAND
As you can see, pipelines are written branch wise and we have written one for the master branch. We are assigning the pipeline a name, defining the deployment type, listing the services used — in this case, docker, and writing a script which does the following:
- we are defining a variable EXECUTE_DEPLOYMENT_FILE_COMMAND which is referring to the master.sh file in the given directory
- using chmod, which is change mode, we are setting this file to the executable mode
- finally, we are executing the file
What is the master.sh file and how do we create it?
The .sh file is a shell script or a simple text file with commands to execute in a UNIX based operating system. This file will contain the steps of the pipeline. Create the master.sh file in the directory as shown below. Create the .bitbucket directory in the project directory. You can name the .sh file anything you want.
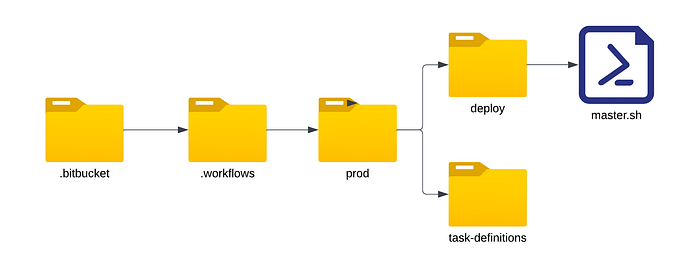
What is the task-definitions folder? We will find out in part 2 of this blog.
The master.sh file looks like this.
#!/bin/bash
echo Installing AWS CLI ...
apt-get update && apt-get install -y jq
curl "https://awscli.amazonaws.com/awscli-exe-linux-x86_64.zip" -o "awscliv2.zip"
unzip awscliv2.zip
./aws/install

echo Logging into AWS ECR ...
aws ecr get-login-password --region ${AWS_DEFAULT_REGION} | docker login --username AWS --password-stdin ${AWS_REGISTRY_URL}

echo Building and pushing the container image ...
export BUILD_ID=$BITBUCKET_BRANCH_$BITBUCKET_COMMIT_$BITBUCKET_BUILD_NUMBER
export IMAGE_NAME=${AWS_REGISTRY_URL}:master-$BUILD_ID
echo $IMAGE_NAME
docker build -t $IMAGE_NAME .
docker push $IMAGE_NAME

echo Deploying to ECS ...
export TASK_DEFINTION_TO_DEPLOY=$(jq . ./.bitbucket/workflows/prod/task-definitions/flask-app-backend.json)
export UPDATED_IMAGE_TASK_DEFINITION=$(echo $TASK_DEFINTION_TO_DEPLOY | jq --arg IMAGE "$IMAGE_NAME" '.containerDefinitions[0].image = $IMAGE')
echo $UPDATED_IMAGE_TASK_DEFINITION > output.json
export NEW_TASK_INFO=$(aws ecs register-task-definition --cli-input-json file://output.json)
export NEW_TASK_DEFINITION_ARN=$(echo $NEW_TASK_INFO | jq '.taskDefinition.taskDefinitionArn' --raw-output)
aws ecs update-service --service ${ECS_CLUSTER_SERVICE_NAME} --cluster ${ECS_CLUSTER_NAME} --task-definition ${NEW_TASK_DEFINITION_ARN}
Let’s understand the contents of the master.sh file. Once the code is pushed/merged to the master branch, the YAML file begins executing the EXECUTE_DEPLOYMENT_FILE_COMMAND which is the master.sh file by
- installing the AWS CLI
- logging into AWS ECR using the AWS credentials
- returning a BUILD_ID for this particular merge
- curating an image name for the docker image using the AWS registry URL and the BUILD_ID, which gives the docker image a unique tag for every image and makes it easy to identify. Consider ${AWS_REGISTRY_URL}:master-$BUILD_ID for example, here, everything after the ‘:’ is called the image tag which is the branch name and the BUILD_ID.
- docker builds this image and pushes the image to ECR
The third part of the master.sh file titled as ‘Deploying to ECS’ is defining the task-definition to spin a container out of the image pushed to ECR and to start the ECS service. Now this might sound like jargon being thrown at you but we will cover this step and more in part 2 of this blog.
Define variables on bitbucket
One last thing before we conclude, where are the AWS credentials, AWS_DEFAULT_REGION_NAME, AWS_REGISTRY_URL stored and how is it being retrieved? These are added as variables on Bitbucket.
- We open the flask-app repository on bitbucket.
- Click on the bitbucket-pipelines.yml file and edit it.
- This opens a left panel with two tabs — configure and documentation.
- Under configure, we choose ‘Add Variables’
- We add the AWS_DEFAULT_REGION, AWS_REGISTRY_URL, AWS_ACCESS_KEY and AWS_SECRET_KEY in the repository section because these have the repository scope and all pipelines for this repository will have the same value for these variables.
- The branch dependent variables like ECS_CLUSTER_NAME and ECS_CLUSTER_SERVICE_NAME will be under the appropriate deployment type defined in the YAML file for this particular pipeline. Each branch and therefore each environment and pipeline will have its own ECS Service, so their values will change from one deployment type to another. We will update the values of these variables in the next section.
This concludes the part where we set up the CI/CD Pipeline and we are now production-ready to automate the application deployment process. The next time we merge the code to master, we sit back and watch half the magic happen. Half? Because we have another mountain to break down — Amazon ECS. We will learn to configure and get Amazon ECS production-ready as well in part 2 of this blog and watch our pipeline come alive!